This highly configurable device IIoT driver for CNCnetPDM enables you to acquire and output all data that can be read from Mitsubishi controllers on Citizen Cincom machines. Here you can find a list of sections with all possible commands. By using commands that are writable you can also set or change parameters at the controller from a remote PC.
You can dynamically define your own set of items (up to 30) that can be enabled and disabled on a per machine basis by an INI file that is automatically created for each machine configured. This INI file also allows you to define your own names for every tag.
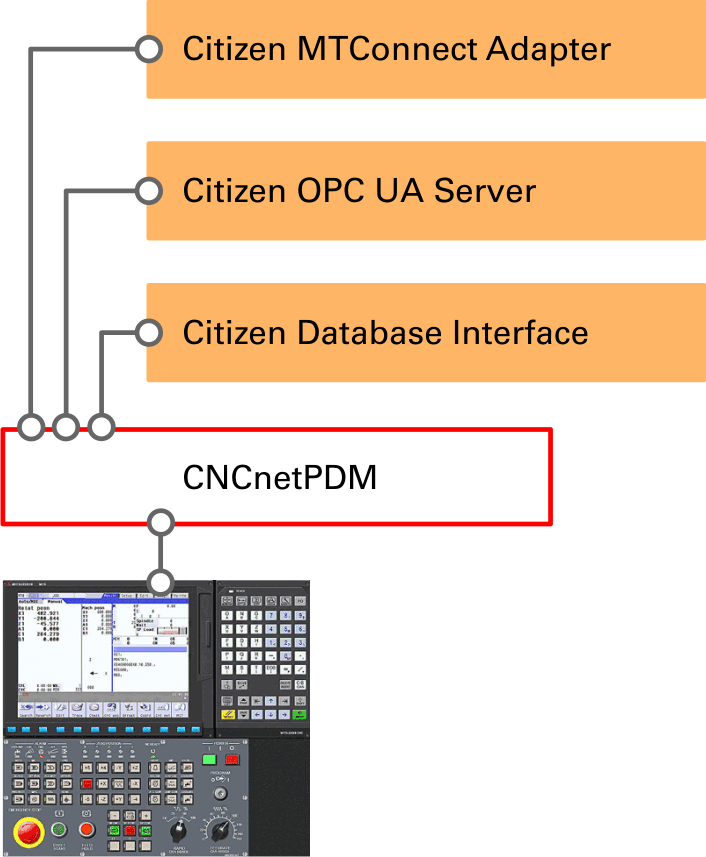
CNCnetPDM Citizen IoT Interfaces
The Citizen MTConnect Adapter enables to read and write data from or to Citizen machines by any MTConnect compatible application
The Citizen OPC UA Server adds OPC UA functionality to machines from Citizen with Mitsubishi or Fanuc controllers
Make sure that you have a connection from your PC to the machine and get data, use the MitsubishiCitizen utility to do so. Please also open port 683 in your Firewall.
This device driver requires the most recent version of CNCnetPDM and also works with a free license. However, in this mode you only get output for the first item configured in your INI file. With a valid license you are able to output the result of up to 30 functions per reading cycle, see licensing for details.
Download the Citizen Mitsubishi driver, extract all content of mitsubishi_citizen_dll.zip into the folder where you have CNCnetPDM installed.
Edit CNCnetPDM.ini and add a new device as described in the quick start guide point 6. If you already have an entry in section [RS232] for a machine from Citizen or Mazak with a Mitsubishi controller you can simply copy and paste this line and change its content. You may comment out the previous entry by prepending a semicolon ‘;’ if it’s the same machine.
Change the line as follows:
FIG 2: Configure device Citizen Mitsubishi in CNCnetPDM.ini
For Citizen machines with Mitsubishi controllers the following 3 parameters are important
Right to the IP Address of the controller enter number 683 (=port)
Right to the DNS Hostname of your machine enter the Mitsubishi number as configured, see next section.
Change the driver name to citizen.dll
CITIZEN MITSUBISHI SETUP
In the folder where you have CNCnetPDM installed open file melcfg.ini with a text editor and scroll down to section [HOSTS] (1).
melcfg.ini comes with predefined entries for up to 54 machines, every line in section [HOSTS] contains Mitsubishi machine number (the number after TCP), IP Address and TCP Port of a single machine.
Replace the default IP Address 192.168.1.100 with the IP Address of your controller (2), note down the machine number (3) and save the file. If, for example, the IP Address of your first controller is 192.168.1.2 the line should look like TCP1=192.168.1.2,683
FIG 3: Adjust melcfg.ini file
READ DATA
Start CNCnetPDM, foreground program is sufficient (Start thread)
CNCnetPDM automatically copies the original citizen.dll and appends the machine number as configured in the INI file, e.g. citizen_1000.dll for machine 1000.
In addition an INI file with the same name is created by the device driver, e.g. citizen_1000.ini for your first machine.
Double click CNCnetControl, if your device number is 1000 and the device name is CITIZEN #1 the output should be similar to the one below:
FIG 4: CNCnetControl (Citizen Mitsubishi)
The machine (1) shows up as connected (2) which is good. On the right side (3) you see the acquired data:
The line starting with O contains most of items defined in the INI file of the device (e.g. Citizen_1000.ini). If you didn’t change the ini file you get something like the following:
Every item has a description followed by its value. All descriptions and values are delimited by pipe ‘|’ symbols. This allows the most recent version of CNCnetPDM to create a database record for every item.
With an unmodified INI file the initial items are:
ID
NAME
DESCRIPTION
1
STATN
Machine state number
2
MODEN
Controller mode number
3
PRGCU
Current NC program
4
PRGCM
Program comment
5
CFEED
Commanded feed rate
6
FEEDR
Current feed rate
7
PRGMN
Main NC program
8
SPDNR
Spindle number
9
CV501
Common variable #501
10
ERR0 - ERR9
Up to 10 current alarm messages sorted by priority
FIG 5: IDs, names and description of items
Note: If you already have a machine specific INI file you can add the following sections to acquire alarm data and read/write common variable 501:
[9]
Axisflag = 0
ParameterNumber = 501
Datatype = T_DOUBLE
Command = SECT_COMMON_VAL1(x)
Active = 1
Name = CV501
Comment = Common variable #501
Output section = 3

[10]
Axisflag = 0
ParameterNumber = 10
Datatype = T_ALM
Command = M_SSEC_CUR_ALARMS
Active = 1
Name = ERR
Comment = Current alarm messages
Output section = 2
WRITE DATA
This device driver allows you to create items or change data at the controller by using writable commands f.i. common variable >= 500 SECT_COMMON_VAL1(x).
To write to a controller for security reasons a section with the respective command has to exist in your machine INI file. With an unmodified machine INI file you can use command 9 (Reads common variable 501) for testing. For commands with an (x) parameter the driver allows to write data for any valid parameter number e.g. with SECT_COMMON_VAL1(x) you can set all common variables >= 500.
The most simple way to test writing operations is to use CNCnetControl:
To change the value of common variable 501 click on the machine (1) in the left area followed by button [Command] (2). In the dialog window enter Number 9 (3). As command text use 1|0|501|4.055 (4). Items in the command text are part system 1, axis number 0, parameter number 501 and new item value 4.055 delimited by pipe ‘|’ characters. Clicking on [OK] (5) executes the command. If successful the output of tag CV501 changes to the new value.
FIG 6: Set new value for common variable 501 with CNCnetControl
You can also write data by using the CNCnetPDM MTConnect API with your own applications (see Free Open Source Client C#) or the MTConnect Agent Tester. In this case commands have to be input by using the following format (for the above example):
* device|1000|command|9|1|0|501|4.055
* device|1000 = Select device number 1000
command|9 = Command number 9
1|0|501|4.055 = part system 1, axis flag 0, parameter 501, new value 4.055
All items have to be delimited by using a pipe ‘|’ character.
Results of all writing operations are written to the devices log file log_devicenr_date.txt in subfolder \log of the CNCnetPDM directory.
ADJUST ITEMS
This device driver enables to dynamically add, group, enable or disable items and change their names. The INI file automatically created by the device driver for every machine contains sections that allow you to control its behavior.
Section [GENERAL] contains information about global parameters used by the driver on startup, usually there’s no need to change the preset values for Axisflag and System. Commands defines the number of commands you’d like to execute, maximum value = 30.
Numeric section [0] defines how you’d like to detect if the controller is accessible. If this command does not succeed the driver assumes that the controller is not accessible. In this case all other commands are not executed.
Description of the numeric sections:
Entry
Description
[0]
Section identifier, numbers > 0 are queried items
Axisflag
If a command is related to an axis (e.g. Axis position) you can enter a number to get data related to a specific axis, e.g. 1
ParameterNumber
If column Command in the documentation ends with ‘(X)’ you can enter a number the driver should use for this command. If you enter 500 for SECT_COMMON_VAL1(x) the driver queries common variable 500
Datatype
Datatype to be used for output. As this is not well documented it’s a bit of guesswork but shouldn’t be too difficult. For commands that obviously output integer (numeric) values like program number you can use T_CHAR, T_SHORT, T_LONG, T_UCHAR, T_USHORT, T_ULONG. Recommended = T_LONG
For floating point numbers like axis position you have to use T_DOUBLE or T_FLOATBIN. Recommended = T_FLOATBIN
For characters like program comment you have to use T_STR
Command
Command to be executed e.g. SECT_RUN_STATUS for running status. To change a command first select a section. Then, simply copy the selected command (e.g. SECT_COMMON_VAL1(x)) and paste it into the INI file. Make sure that you also enter an appropriate data type (e.g. T_LONG) for the command in Datatype.
Active
If you set this to 0 the command is not executed
Name
A short name (max 5 characters) to describe the item e.g. STATN for status number
Comment
A comment that describes the command (optional)
Output section
You can output data to 3 sections that may contain up to 256 characters. 1 goes to section ‘O’, 2 to ‘A’ and 3 to ‘F’. If data in one section exceeds the maximum length you can send items to a different section. Make sure you have entries CollectOrders, CollectFeeder and CollectQuality enabled (=1) in CNCnetPDM.ini.
FIG 7: Description of INI file section
To change commands, switch items on or off or alter its name while CNCnetPDM is running open the INI file with a text editor such as notepad, make the desired changes and save the file. To apply the changes immediately you can click on the machine in CNCnetControl on the left side followed by clicking buttons ‘Close’ and ‘Open’ above the section ‘Devices’.
TIPS
An overview of all sections that lead to pages that contain commands belonging to the specific section can be found here.
If you enter a wrong data type for output of data in the INI file you may get data but the values are incorrect.
If you want to add additional items first adjust the number of commands in section [GENERAL]. Then, copy and paste the last numeric section and adjust the section number and its content.
TROUBLESHOOTING
If the machine shows a red icon, state disconnected and you get just output E = 0 The machine is not reachable at all. This has nothing to do with the Citizen Mitsubishi API, it’s a network issue, DNS Hostname or IP Address is wrong.
If the machine also shows a red icon, state disconnected but you just get output E = 1 The machine is reachable but the API does not respond to commands, check your Citizen Mitsubishi setup (melcfg.ini) and the parameters used in CNCnetPDM.ini (esp. Port number). You can also use the tool MitsubishiCitizen to check if the machine replies to commands.
If you do not get any of the preconfigured items Make sure that CollectOrders is set to 1 in section [General] of CNCnetPDM.ini. If you forced items to sections 2 or 3 set CollectQuality and CollectFeeder to 1.
If specific items are not acquired Check first with MitsubishiCitizen that you get output. Also make sure that the numeric section of the item in the device drivers INI file is activated and has an entry for ‘Name’, inactive or items with empty names are not acquired.
CONTROLLERS
The driver was tested and works with the following controllers on Citizen machines, others may work as well:
Controller
Mitsubishi Series
MELDAS FCA70LPC-2A
M70
MELDAS M635L
M635
M635L
M635
MELDAS FCA70LPC-2AV
M70
MELDAS FCA70LPC-2AVU
M70
M735LUC
M700
MELDAS FCA70LPC-2AVU
M70
MELDAS FCA70LPC-2AV
M70
M500
M500
MELDAS FCA730LPC-4VS
M730
FIG 8: Tested Citizen Mitsubishi Controllers
UPGRADE DRIVER
If you already have a previous version of the driver installed and would like to upgrade to the most recent version proceed as follows:
Stop any CNCnetPDM background service or foreground program that uses the device driver.
Backup (copy) melcfg.ini to a folder of your choice.
Extract all content of mitsubishi_citizen_dll.zip into the folder where you have CNCnetPDM installed, overwrite the existing files.
Delete all citizen_NNNN.dll (NNNN = machine number) files. If you already have created adapted INI files for specific devices do NOT delete the citizen_NNNN.ini files.
Adjust the new melcfg.ini file (recommended) OR restore (copy) melcfg.ini from your backup folder to the directory where you have CNCnetPDM installed, overwrite the existing file.
After restarting CNCnetPDM upgraded device driver versions for all machines are automatically created.
Privacy notice
This website uses cookies. By continuing to use it you agree to our privacy policy.